Examining, configuring and playing with the MikroTik RouterBOARD RB751G-2HnD for the first time
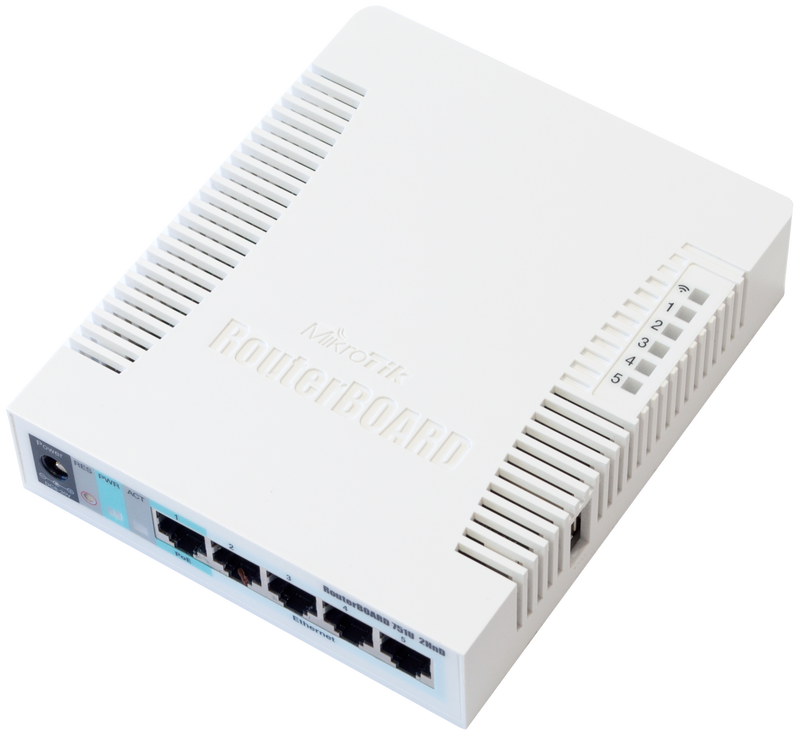
I bought a MikroTik RouterBOARD RB751G-2HnD a little while back. Tonight is the first time I power it up and connect to it, examining what it can do, and how to do it. From the outside it’s a nice looking little box, with a seemingly sturdy enough plastic casing with the size of 113x138x29mm. There are holes for passive cooling, some status LEDs, 5 RJ45 ports, and a USB 2.0 port. On the other side there is an antenna connector for an external MMCX antenna.
The labeling on my case is “RouterBOARD 751G”.
The product page says says:
The RB751G is the wireless SOHO Gigabit AP you have been waiting for. It has five Gigabit Ethernet ports, one USB 2.0 port and a high power 30dBi/1W 802.11b/g/n wireless AP with antennas built in.
It’s also possible to connect an external MMCX antenna to replace one of the built in antennas. The device is very small and will look good in any home or office, wall mounting anchor holes are provided.
Package contains RouterBOARD 751G-2HnD in a plastic case and power adapter.
RB751G-2HnD will be available in United States through our Distributor network when FCC certification will be ready, hopefully by the end of March.
Specifications
| Product code | RB751G-2HnD |
| Current Monitor | No |
| TX power | 30dBm |
| CPU | Atheros AR7242 |
| Antenna gain | 2×2 MIMO PIF antennas, max gain 2.5dBi; external MMCX option |
| CPU speed | 400MHz |
| Max Power consumption | 13W |
| RAM | 64MB |
| LAN ports | 5 |
| Gigabit | Yes |
| MiniPCI | 0 |
| Integrated Wireless | 1 |
| Wireless standards | 802.11b/g/n |
| USB | 1 |
| Power Jack | 8-30V DC |
| 802.3af support | No |
| PoE | 8-30V DC on Ether1 |
| Voltage Monitor | No |
| PCB temperature monitor | No |
| CPU temperature monitor | No |
| Dimensions | 113x138x29mm |
| Operating System | RouterOS |
| Temperature range | -20C…+50C |
| RouterOS License | L4 |

Ethernet throughput
| RB751G-2HnD @400MHz (5 port test) | 64 byte frames | 512 byte frames | 1518 byte frames | |||||
|---|---|---|---|---|---|---|---|---|
| IP Firewall | Conntrack | Mode | Mbps | Fps | Mbps | Fps | Mbps | Fps |
| off | off | Bridging | 49.66 | 97000 | 370.28 | 90400 | 949.66 | 78200 |
| on | off | Routing | 34 | 66400 | 266.24 | 65000 | 631.49 | 52000 |
| on | off | Bridging | 30.77 | 60100 | 234.7 | 57300 | 650.92 | 53600 |
| on | on | Routing | 25.6 | 50000 | 200.7 | 49000 | 479.69 | 39500 |
| on | on | Bridging | 18.02 | 35200 | 141.72 | 34600 | 386.18 | 31800 |
Powering up and connecting
Alright, we are ready to power it up. The Quick Setup Guide says:
Powering
The device accepts powering from the power jack or from the first Ethernet port (Passive PoE):
- DC power jack (5.5mm outside and 2mm inside diameter, female, pin positive plug) accepts 8-30V DC
- The first Ethernet port accepts passive Power over Ethernet accepts 8-30V DC
Under maximum load, the power consumption of this device is 7W
I currently do not have a PoE-switch or any power injector to give the RouterBOARD power on its first ethernet port, which is the 751G’s incoming PoE-port (the so-called “WAN-port”, the uplink port).
(Update: As “P” kindly points out in his comment below, a PoE-switch would not have helped me much, since the RB751G-2HnD does not support 802.3af, only DC-power injected directly on the right pair.)
Instead I connect the DC power adapter to a power outlet, then to the device, and we have blinkenlights!
After that I connect a straight CAT 5 cable to my laptop, and to port 4 (the fifth, rightmost RJ45-port on the device).
My laptop’s eth0 (first Ethernet port) is configured as:
allow-hotplug eth0
iface eth0 inet dhcp
So, I quite immediately get an IP address from the RouterBOARD’s DHCP server:
eth0      Link encap:Ethernet  HWaddr [...]
          inet addr:192.168.88.254  Bcast:192.168.88.255  Mask:255.255.255.0
[...]
The Quick Setup Guide says:
Connecting
- Connect your Internet cable to port 1, and LAN computers to ports 2-5
- Set LAN computer IP configuration to automatic (DHCP)
- Default IP address from LAN/WLAN is 192.168.88.1, connect with SSH, Telnet or Winbox tool for configuration. The username is admin and there is no password
- Wireless AP mode is enabled by default, you can connect to the SSID “MikroTik”. Log into your router and configure a WPA wireless password to secure your network
SSH and default configuration
So I connected to it with ssh, without entering a password, and was presented with:
ssh admin@192.168.88.1

  MMM MMMM MMM  III  KKK  KKK  RRRRRR     OOOOOO      TTT     III  KKK  KKK
  MMM  MM  MMM  III  KKKKK     RRR  RRR  OOO  OOO     TTT     III  KKKKK
  MMM      MMM  III  KKK KKK   RRRRRR    OOO  OOO     TTT     III  KKK KKK
  MMM      MMM  III  KKK  KKK  RRR  RRR   OOOOOO      TTT     III  KKK  KKK

  MikroTik RouterOS 5.6 (c) 1999-2011       http://www.mikrotik.com/

The following default configuration has been installed on your router:
-------------------------------------------------------------------------------
ether1 is renamed to ether1-gateway
DHCP client and masquerade is set on ether1-gateway
ether2 is renamed to ether2-master-local and configured as switch master port for ether3-ether5
ether2-master-local and wlan1 are bridged
wireless is set as access point in 2412MHz using both chains and extension channel enabled.
IP address 192.168.88.1/24 and DHCP server is set on bridge interface
   P servers address pool is 192.168.88.10-192.168.88.254

'/system default-configuration print' command.
To remove this default configuration type "r" or hit any other key to continue.
If you are connected using the above IP and you remove it, you will be disconnected.

Confirming configuration
As logical minds will conclude from the output, I hit the any key, and continued. One can also observe that the DHCP pool is seemingly assigning addresses to hosts downwards from the pool’s max value, which is a good as any design decision. (Unless it is random, and we were extremely lucky this time to be assigned 192.168.88.254.)
After that I disconnected, and connected again, and was then presented with:
  MMM      MMM       KKK                          TTTTTTTTTTT      KKK
  MMMM    MMMM       KKK                          TTTTTTTTTTT      KKK
  MMM MMMM MMM  III  KKK  KKK  RRRRRR     OOOOOO      TTT     III  KKK  KKK
  MMM  MM  MMM  III  KKKKK     RRR  RRR  OOO  OOO     TTT     III  KKKKK
  MMM      MMM  III  KKK KKK   RRRRRR    OOO  OOO     TTT     III  KKK KKK
  MMM      MMM  III  KKK  KKK  RRR  RRR   OOOOOO      TTT     III  KKK  KKK

  MikroTik RouterOS 5.6 (c) 1999-2011       http://www.mikrotik.com/

[admin@MikroTik] >
A press on TAB reveals the available RouterOS commands:
certificate  interface  metarouter  ppp     routing        store   user   export  password  redo
driver       ip         mpls        queue   snmp           system  beep   import  ping      setup
file         log        port        radius  special-login  tool    blink  led     quit      undo
[admin@MikroTik] >
After a few seconds, TAB-completions and “?” I found:
[admin@MikroTik] > system routerboard print
       routerboard: yes
             model: 751G-2HnD
     serial-number: [...]
  current-firmware: 2.37
  upgrade-firmware: 2.36
The full list of available commands in the root of the command tree is listed with a question mark, “?”, (the first or second button one presses in a terminal when dealing with network equipment, or any system really, if one has worked with any common brand/model/os):
beep --
blink --
certificate -- Certificate management
delay -- does nothing for a while
do -- executes command
driver -- Driver management
environment -- list of all variables
error -- make error value
execute -- run script as separate console job
file -- Local router file storage.
find -- Find items by value
for -- executes command for a range of integer values
foreach -- executes command for every element in a list
global -- set value global variable
if -- executes command if condition is true
import --
interface --
ip -- IP options
led --
len -- return number of elements in value
local -- set value of local variable
log -- System logs
metarouter --
mpls --
nothing -- do nothing and return nothing
parse -- build command from text
password -- Change password
pick -- return range of string characters or array values
ping -- Send ICMP Echo packets
port -- Serial ports
ppp -- Point to Point Protocol
put -- prints argument on the screen
queue -- Bandwidth management
quit -- Quit console
radius -- Radius client settings
redo -- Redo previously undone action
resolve -- perform a dns lookup of domain name
routing --
set -- Change item properties
setup -- Do basic setup of system
snmp -- SNMP settings
special-login -- Special login users
store --
system -- System information and utilities
terminal -- commands related to terminal handling
time -- returns time taken by command to execute
toarray -- convert argument to array value
tobool -- convert argument to truth value
toid -- convert argument to internal number value
toip -- convert argument to IP address value
toip6 -- convert argument to IPv6 address value
tonum -- convert argument to integer number value
tool -- Diagnostics tools
tostr -- convert argument to string value
totime -- convert argument to time interval value
typeof -- return type of value
undo -- Undo previous action
user -- User management
while -- executes command while condition is true
export -- Print or save an export script that can be used to restore configuration
The first thing one just has to try is of course “blink”:
[admin@MikroTik] > blink duration=1 ;
And it blinks its ACT (Activity) LED! I’m already starting to love this little thing. I guess it does not have any tiny speaker connected, because the “beep” command doesn’t produce any sound, though the command works. (The semicolon above is not necessary, but it is added if TAB-completing. That brings me to another observation, the CLI-interface is very easily understood, beautiful, intuitive, helpful and just.. nice.
Let’s see what IP services it’s running by default (the addition of “detail” doesn’t give more detailed output in this case, but it formats the output better for pasting here, try it without “detail” yourself to see what I mean):
[admin@MikroTik] > ip service print detail
Flags: X - disabled, I - invalid
 0   name="telnet" port=23

 1   name="ftp" port=21

 2   name="www" port=80

 3   name="ssh" port=22

 4 X name="www-ssl" port=443 certificate=none

 5 X name="api" port=8728

 6   name="winbox" port=8291
Let’s see and confirm if that is the truth, and what the services say:
PORT     STATE SERVICE
21/tcp   open  ftp
22/tcp   open  ssh
23/tcp   open  telnet
53/tcp   open  domain
80/tcp   open  http
2000/tcp open  callbook
8291/tcp open  unknown

PORT     STATE SERVICE   VERSION
21/tcp   open  ftp       MikroTik router ftpd 5.6
22/tcp   open  ssh       (protocol 2.0)
|_ ssh-hostkey: 1024 [...] (DSA)
23/tcp   open  telnet    Linux telnetd
53/tcp   open  domain?
80/tcp   open  http?
|  robots.txt: has 1 disallowed entry
|_ /
|_ html-title: RouterOS router configuration page
2000/tcp open  callbook?
So, it also runs a DNS server/forwarder, and something on port 2000, by default, which doesn’t show when looking at the services configuration of the device.
[admin@MikroTik] > tool bandwidth-server print
                  enabled: yes
             authenticate: yes
  allocate-udp-ports-from: 2000
             max-sessions: 100
As you see, it runs some form of bandwidth testing server on port 2000. I have to look into that more another time. It’s documented in their wiki. Perhaps/probably the server and client is proprietary, but we’ll have to investigate further later like I said.
I also noticed that critical log messages are printed to the console (my ssh session). The following happened when I scanned it: (since it has not yet had Internet access it has not had the opportunity to set its clock using NTP yet, if it does by default, and I have not yet set it, if you are wondering)
jan/02/1970 03:54:36 system,error,critical login failure for user anonymous from 192.168.88.254 via ftp
Web interface
The next thing to check is the web-interface, which is running by default. It looks like this:
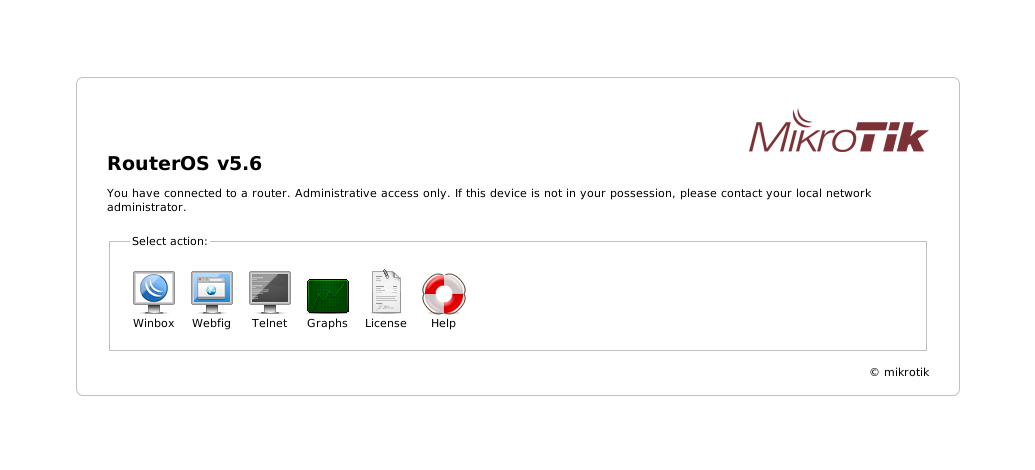
When clicking on the WebFig-icon, we are given a login prompt, we log in with the default username “admin”, and no password, and we are presented with:
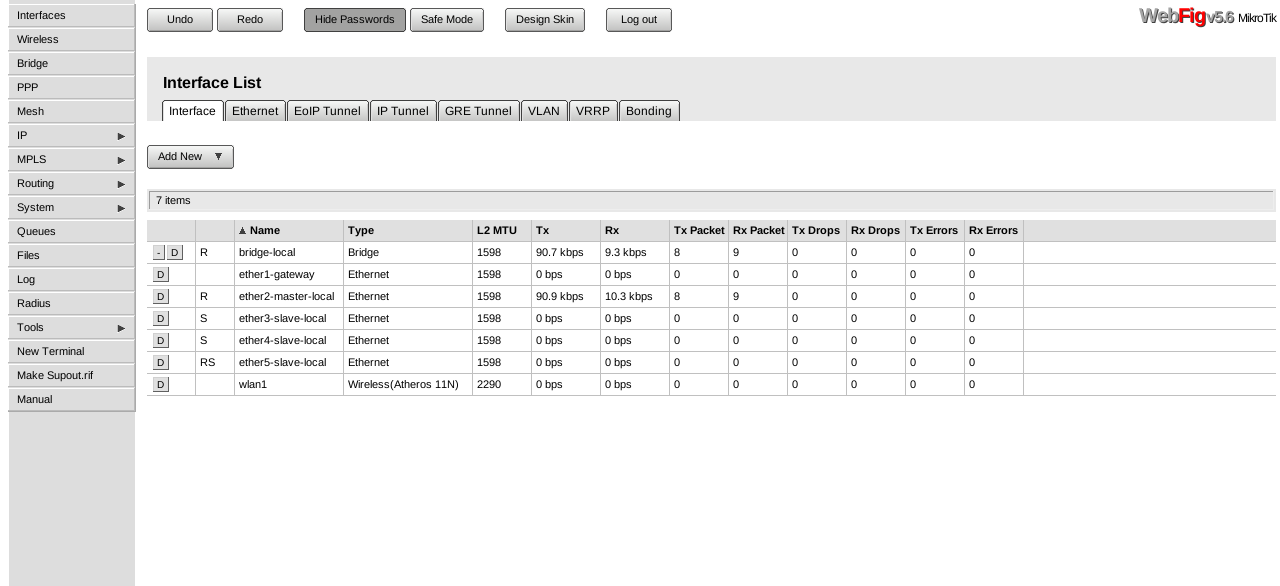
The configuration hierarchy in the WebFig interface is the same as in the command line interface, and it seems logical, straightforward and clean, as it should be.
Wireless
I also connected to it over wireless, using the following /etc/network/interfaces configuration:
# MikroTik
allow-hotplug wlan0
iface wlan0 inet dhcp
    wireless-essid MikroTik
On my laptop:
wlan0     IEEE 802.11abgn  ESSID:"MikroTik"
          Mode:Managed  Frequency:2.412 GHz  Access Point: 00:0C:42:[..]
          Bit Rate=150 Mb/s   Tx-Power=15 dBm
          Retry  long limit:7   RTS thr:off   Fragment thr:off
          Encryption key:off
          Power Management:off
          Link Quality=70/70  Signal level=-8 dBm
          Rx invalid nwid:0  Rx invalid crypt:0  Rx invalid frag:0
          Tx excessive retries:0  Invalid misc:0   Missed beacon:0
And on the RB751G:
[admin@MikroTik] > interface wireless registration-table print
 # INTERFACE                          RADIO-NAME       MAC-ADDRESS       AP  SIGNAL-STRENGTH TX-RATE UPTIME
 0 wlan1                                               00:21:5D:[..]     no  -34dBm@HT40-7   36.0... 3m48s
Conclusion
I’m really impressed by the MikroTik RouterBOARD RB751G-2HnD so far, by just looking at it quickly like this. I will lab/play more with it and test out its functions in later articles.
Related articles
- Examining, configuring and playing with the MikroTik RouterBOARD RB751G-2HnD for the first time
- Securing the MikroTik RouterBOARD RB751G-2HnD (or any RouterOS device) – the bare minimum
I hope this has been informative, and I would like to thank You for reading. Feel free to comment.
6 thoughts on “Examining, configuring and playing with the MikroTik RouterBOARD RB751G-2HnD for the first time”
Leave a Reply
Filed under: English,routerboard - @ March 26, 2012 00:10
Tags: mikrotik, networking, routerboard, routeros, wifi
I doubt a PoE-switch would help you, it doesn’t support 802.3af so it can’t negotiate with the switch to get power supplied.
It just relies on DC-power injected directly on the right pair, at all times.
Thank you P for pointing that out. I have updated the article to include your sharp observation.
bagaimana caranya membuat halaman login untuk hotspots
For myself and others; yusran’s comment is in Indonesian, and translates to English as:
“how to create a login page for hotspots”
That is a good topic. I might write something about that later. Thanks for your comment yusran, or:
“Terima kasih atas tanggapan Anda Yusran”
bagaimana untuk membuat setup menggunakan broadband
system,error,critical login failure for user admin from 192.168.6.1 via winbox ……what is this